Sign In
Upload
Manuals
Brands
Panasonic Manuals
Camcorder
AG-HPX250EN
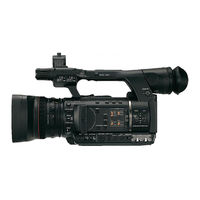
Panasonic AG-HPX250EN P2 HD Camcorder Manuals
Manuals and User Guides for Panasonic AG-HPX250EN P2 HD Camcorder. We have
3
Panasonic AG-HPX250EN P2 HD Camcorder manuals available for free PDF download: Operating Instructions Manual, Electrical Adjustment
Panasonic AG-HPX250EN Operating Instructions Manual (170 pages)
Panasonic AG-HPX250: User Guide
Brand:
Panasonic
| Category:
Camcorder
| Size: 12.68 MB
Table of Contents
Before Use
3
Description of Parts
3
Shooting
4
Table of Contents
4
Viewfinder
6
Using The Viewfinder
6
Using The Lcd Monitor
7
Emphasizing Image Outlines
7
Adjusting The Screen Display
8
Changing Backlight Brightness
8
Tally Lamp
9
Basic Shooting Operations
10
Preparing To Shoot
10
Shooting In Auto Mode
10
Checking Photos Taken (Rec Check)
12
P2 Card Access Lamps
12
Protecting Against A Possible Erasure
12
Formatting P2 Cards
13
P2 Card Recording Times
14
Remove The P2 Card
15
Using SD/SDHC Memory Cards
16
Installing and Removing the SD Memory Card
16
Formatting Sd Memory Card
16
Cautions In Using Sd Memory Cards
17
Using the Zoom Function
18
Digital Zoom Function
19
Shooting in Progressive Mode
20
Standard Recording
20
(Pull-Down Recording)
20
Native Recording
20
Recording with Variable Frame Rate (VFR)
21
Native Vfr Recording
21
Standard VFR Recording (Pulldown Recording)
22
Using Progressive Mode and VFR Recording Function
23
Flow Effect Shooting
27
Shooting in Manual Mode
28
Switching To Manual Mode
28
Manual Focusing
28
Using Focus Assist Function
29
Iris Adjustments
30
Adjusting The Gain
30
Using Super Gain
31
Light Intensity Adjustments
31
Adjusting the White Balance and Black Balance
32
Adjusting The White Balance
32
Adjusting The Black Balance
34
Shooting Techniques for Different Targets
35
Low-Angle Shooting
35
Self-Portrait Shooting
35
Scan Reverse Shooting
35
Zebra Pattern
35
Center Marker Display
36
Safety Zone Markers
36
Checking And Displaying Shooting Status
36
Changing The Image Size
37
Optical Image Stabilizer
37
Drs (Dynamic Range Stretcher) Function
37
Fbc (Flash Band Compensation)
38
Using The User Buttons
39
Backlight Compensation
40
Color Bars
40
Waveform Monitor Function
40
Adjusting The Volume While Shooting
40
Backup Recording
40
2-Slot Continuous Recording
41
Shot Mark Function
41
Text Memo Recording
42
Time Stamp Function
42
Last Clip Delete Function
42
Using Special Recording Modes
43
Pre-Recording (Pre Rec)
44
Interval Recording (Interval Rec)
44
One-Shot Recording (One Shot Rec)
45
Loop Recording (Loop Rec)
46
One-Clip Recording (One Clip Rec)
47
Adjusting the Shutter Speed
49
Using Shtr/F.rate Dial
49
Setting Shutter Mode
49
Setting Synchro Scan Mode
50
Setting Frame Rate Mode
51
Switching Audio Input
52
Using The Built-In Microphone
52
Using Another Microphone and Audio Equipment
53
Adjusting the Audio Recording Level Automatically
53
Adjusting The Recording Level
54
Ch3 And Ch4 Recording Levels
55
Audio Level Meter Magnification
55
Using Scene Files (Scene File Data)
56
Changing Scene File Settings
56
Saving Scene Files and Other Settings on SD Memory Cards
58
Configuration Of Setup Data Files
60
Using Time Data
61
Counter Setting And Display
61
Time Data Overview
61
Setting User Bits
62
Entering The User Bits
63
Setting The Time Code
66
Externally Locking The Time Code
67
Outputting The Time Code Externally
70
Recording Time Codes And User Bits
71
Playback
71
Playback
72
Playback
73
Basic Playback Operations
74
Thumbnail Operations
75
Thumbnail Manipulations Overview
76
Thumbnail Screen
77
Selecting Thumbnails
79
Playing Back Clips
79
Switching The Thumbnail Display
80
Changing Thumbnails
81
Shot Mark
82
Text Memo
82
Deleting Clips
84
Restoring Clips
85
Reconnection Of Incomplete Clips
85
Copying Clips
86
Setting Of Clip Meta Data
87
Recording Method
90
Formatting A P2 Card
91
Formatting Sd Memory Cards
92
Setting The Thumbnail Display Mode
92
Properties
93
P2 Card Status Display
95
Sd Memory Card Status Display
98
Useful Playback Functions
99
Variable Speed Search
99
Slow Playback
99
Fast Forward/Rewind Playback
99
Frame-By-Frame Playback
99
Clip Skip
100
Adjusting The Volume
100
Viewing Images On A Tv/Monitor
100
Checking The Date And Time
100
Connecting External Units
101
Headphones
101
External Microphone
101
Personal Computer (Non-Linear Editing/File Transfer)
102
Hard Disk Drive (Data Copying)
102
Digital Video Equipment (Dubbing)
103
Tv/Monitor (Playback/Dubbing)
104
Connections to the DVCPRO/DV Connector
105
Recording Signals Input to the DVCPRO/DV Connector
105
Control of External Devices through 1394 Connection
106
Precautions In 1394 Connections
107
Nonlinear Editing with P2 Card (PC Mode: USB Device)
109
Procedures for Making Connections to a Personal Computer
109
Using a Hard Disk Drive (PC Mode: USB Host)
111
Switching To The Usb Host Mode
111
Using The Usb Host Mode
112
Viewing Hard Disk Drive Information
112
Formatting A Hard Disk Drive
114
Writing Data On A Hard Disk Drive
115
Writing Data Back To P2 Cards
116
Direction For Using A Hard Disk Drive
117
Warning and Error Display for Thumbnail Operation and USB HOST MODE
117
Displays
119
Screen Displays
120
Viewfinder Screen Status Displays
120
Screen Displays
121
Center Information Display
125
Mode Check Indication
131
Setup Menu List
132
Scene File Screen
132
System Setup Screen
135
Sw Mode Screen
138
Auto Sw Screen
140
Recording Setup Screen
141
Audio Setup Screen
143
Output Sel Screen
145
Display Setup Screen
147
Card Functions Screen
150
Other Functions Screen
151
Diagnostic Screen
153
Option Menu Screen
154
Before Calling for Service
155
Updating the Firmware Incorporated into the Unit
158
Cleaning
159
Storage Precautions
160
How to Handle Data Recorded on P2 Cards
161
Checkpoints for Using Memory Cards
162
Information on Software for this Product
163
Recording Format List
164
Index
165
Advertisement
Panasonic AG-HPX250EN Operating Instructions Manual (36 pages)
Brand:
Panasonic
| Category:
Camcorder
| Size: 4.3 MB
Table of Contents
Operating Instructions
1
Read this First! (for AG-HPX255P)
2
Declaration of Conformity
3
Fcc Warning
3
Important Safety Instructions
4
Read this First! (for AG-HPX255EN)
6
Read this First! (for AG-HPX255P/AG-HPX255EN)
7
Outline of Operations
9
Table of Contents
10
Operating Precautions
12
Precaution for Use
14
Accessories
15
Optional Units
15
Description of Parts
16
Left Side
16
Top and Right Side
17
Front and Rear Side
18
Remote Control
19
Charging the Battery
20
Charging
20
Power Sources
21
Using the Battery
21
Using the AC Adaptor
21
Adjusting the Hand Strap
22
Attaching the Shoulder Strap
22
Detaching and Attaching the Lens Hood
22
Detaching and Attaching the Lens Cap
23
Fitting the Eye Cup
23
The Remote Control
24
Insert the Battery
24
Remote Control Setup
24
Turn On/Off the Camera-Recorder
25
Setting the Calendar
26
Charging the Built-In Battery
27
Basic Operations of Setup Menus
28
Using the Menus
28
Initializing the Menu Settings
29
Setup Menu Structure
30
Specifications
32
Panasonic AG-HPX250EN Electrical Adjustment (20 pages)
Brand:
Panasonic
| Category:
Digital Camera
| Size: 0.49 MB
Table of Contents
Table of Contents
1
1 Preparation of Adjustment
2
PC EVR Software
2
Required Tools and Equipment for PC EVR Software
2
Installation Method of USB Driver
2
Setup for PC EVR Software
5
Adjustment Item
6
Adjustment after Replacement of Major Parts
7
2 Adjustment Procedure
8
Adjustment Tool Screen
8
Zoom Center Adjustment
10
Hall Amp / Iris PWM / OIS Hall Amp Adjustment
10
Zoom Tracking and De-Focus Adjustment
11
White Balance Adjustment
14
Blemish Compensation Adjustment
15
White Shading Adjustment
16
ND FILTER Compensation Adjustment
17
Video Output Level Adjustment
19
Int. Frequency Adjustment
20
Advertisement
Advertisement
Related Products
Panasonic AG-HPX250
Panasonic AGHPX255
Panasonic AG-HPX250EJ
Panasonic AG-HPX255P
Panasonic AG-HPX255EN
Panasonic AG-HPX250P
Panasonic AG-HPX255EJ
Panasonic AG-HPX250P/EJ/EN
Panasonic AG-HPX260MC
Panasonic AG-HPX250PJ
Panasonic Categories
Camcorder
Air Conditioner
TV
Digital Camera
Cordless Telephone
More Panasonic Manuals
Login
Sign In
OR
Sign in with Facebook
Sign in with Google
Upload manual
Upload from disk
Upload from URL