Sign In
Upload
Manuals
Brands
Panasonic Manuals
Camcorder
AJHDX900P - DVCPRO HD CAMERA
Panasonic AJHDX900P - DVCPRO HD CAMERA Manuals
Manuals and User Guides for Panasonic AJHDX900P - DVCPRO HD CAMERA. We have
2
Panasonic AJHDX900P - DVCPRO HD CAMERA manuals available for free PDF download: Operating Instructions Manual, Parts List
Panasonic AJHDX900P - DVCPRO HD CAMERA Operating Instructions Manual (134 pages)
Camera-Recorder
Brand:
Panasonic
| Category:
Camcorder
| Size: 2.9 MB
Table of Contents
Operating Instructions
1
Read this First
4
Table of Contents
5
Chapter 1 General
7
Features of the Camera Unit
7
Features of the VTR Unit
8
Features of the Input/Output Unit
8
Other Featuresa
9
Dimensions Drawing
9
System Configuration
10
Chapter 2 Parts and Their Functions
11
Power Supply and Accessory Mounting Section
11
Audio Function Section
12
Shooting and Recording/Playback Function Section
14
Menu Operation Section
17
Time Code Related Section
18
Warning/Status Display Section
19
Display Window and Its Displays
19
Viewfinder Section
21
Chapter 3 Recording and Playback
22
Cassette Tapes
22
Basic Procedures
23
Scene-To-Scene Continuity
25
To Record Video Signals of a few Seconds before Starting Recording (PRE-RECORDING Function)
26
Recording in Intervals (INTERVAL REC Function)
27
To Take the Previous Cut Again (RETAKE Function)
29
To Check the Last few Seconds of the Recording (Rec-Review Function)
29
Normal Playback and Playback at Different Speeds
29
Chapter 4 Adjustments and Settings for Recording
30
Multi Format
30
Video System and Recording Format
30
Recording Format on Tapes and Signal Format at Output Connector
31
Adjusting the White Balance and Black Balance
32
Adjusting the White Balance
32
Adjusting the Black Balance
34
Setting the Electronic Shutter
35
Shutter Modes
35
Setting the Shutter Mode and Speed
36
Setting the Synchro Scan Mode
36
Selecting the Audio Input Signals and Adjusting Their Recording Levels
37
Selecting the Audio Input Signals
37
Adjusting the Audio Signal Recording Levels
37
CH3 and CH4 Recording Levels
38
Setting the Time Data
38
Setting the User Bits
38
Setting the Internal Clock's Date and Time
42
Setting the Time Code
43
Externally Locking the Time Code
43
Setting the UMID Information
47
Menu Displays on the Viewfinder Screen
48
Menu Configuration
48
Basic Menu Operations
48
Selecting the User Menus
49
Viewfinder Screen Status Displays
50
Viewfinder Lamp Displays
50
Viewfinder Screen Status Display Configuration
50
Selecting the Viewfinder Screen Display Items
50
Display Modes and Setting Changes/Adjustment Result Messages
56
Setting the Marker Displays
56
Setting the Camera ID
56
Mode Check Screen Displays (MODE CHECK Button Function)
57
Marker Check Screen Displays
57
(MARKER SELECT Button Function)
57
Selection of Video Output Signals
58
Settings of Signals Output from VIDEO out Connector
58
Settings of Signals Output from MON out Connector
60
Menu-Driven Function Setup
61
Setting the USER SW GAIN Switching
61
Selecting the F.AUDIO LEVEL Control Function
61
Allocating Functions to the USER MAIN, USER1 and USER2 Buttons
62
Setting the Color Temperature Manually
63
Set Data Handling
64
Handling the Setup Card
65
Setup Card Operations
65
How to Use the User Data
69
How to Use the Scene File Data
70
Method for Returning to User Settings
73
Method for Returning to the Factory Settings
73
Lens File
74
How to Provide Lens Files
74
To Save the Lens File into the Built-In Memory
75
To Read the Lens File from the Built-In Memory
77
To Write in and Read out the Lens File To/From the SD Memory Card
78
Chapter 5 Preparation
80
Supplying the Power
80
Attaching the Battery and Setting the Battery Type
80
Use of the External DC Power Supply
82
Attaching the Lens and Adjusting the Flange Back
83
Adjusting the White Shading of the Lens
84
Audio Input Signal Preparations
86
When Using the Front Microphone
86
When Using a Wireless Receiver
86
When Using an Audio Component
87
Mounting the Unit on a Tripod
87
Attaching the Shoulder Belt
88
Adjusting the Position of the Shoulder Pad
88
Attaching the Rain Cover
88
Attacching the FRONT AUDIO LEVEL Control Knob
88
Connection of the Remote Control Unit (AJ-RC10G)
89
Connection of the External Switch
89
Chapter 6 Maintenance and Inspections
90
Inspections Prior to Shooting
90
Preparation for Inspections
90
Inspecting the Camera Unit
90
Inspecting the VTR Unit
91
Self-Diagnosis Function
92
Maintenance
93
Condensation
93
Head Cleaning
93
Cleaning Inside the Viewfinder
93
Phenomena Inherent to CCD Cameras
93
Replacing the Backup Battery
93
Connectors and Signals
94
Warning System
98
Warning Description Tables
98
Error Codes
100
Emergency Eject
100
Chapter 7 Menu Description Tables
101
Menu Configfation
101
System Setting
102
System Mode
102
Rec Function
102
Output Sel
103
Video out Setting
103
Monitor out Setting
104
Rc out Setting
104
Downcon Setting
105
Genlock
105
Option Mode
106
Paint
107
Rb Gain Control
107
Rgb Black Control
107
Matrix
108
Color Correction
108
Low Setting
109
MID Setting
110
High Setting
110
Addtional Dtl
111
Additional Dtl
111
Skin Tone Dtl
112
Knee/Level
113
Gamma
113
Camera Setting
114
Vf Displays
115
Vf Marker
116
Vf User Box
116
Vf Indicator1
117
Vf Indicator2
117
Mode Check Ind
118
Led
118
Operation
119
Camera ID
119
Shutter Speed
119
Shutter Select
119
User Sw
120
Sw Mode
121
White Balance Mode
121
User Sw Gain
122
Lens/Iris
122
File
123
Card Read/Write
123
Card R/W Select
123
Lens File
123
Lens File Card R/W
123
Scene
123
Initialize
124
Maintenance
124
System Check
124
Diagnostic
124
Lens Adj
124
Black Shading
125
White Shading
125
Lens File Adj
125
Vtr Menu
126
Vtr Function
126
Battery/Tape
126
Battery Setting1
127
Battery Setting2
128
MIC/Audio1
129
MIC/Audio2
129
Tc/Ub
130
Umid Set/Info
131
Vtr Diag
131
Option Menu
131
Chapter 8 Specifications
132
Advertisement
Panasonic AJHDX900P - DVCPRO HD CAMERA Parts List (26 pages)
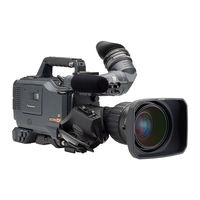
Panasonic Broadcast Camcorder Mechanical Parts List
Brand:
Panasonic
| Category:
Camcorder
| Size: 7.77 MB
Table of Contents
Table of Contents
1
Mechanical Parts List
1
Casing & Frame Assembly
3
Overall Section
3
Acassette Cover Assembly
6
Bside Case (L) Assembly
6
C L Side Section
7
[D] Side Case (R) Section (1)
7
[D] Side Case (R) Section (2)
7
Eside Case (R) 1 Assembly
9
Ffront Case Section
10
Gfront Case 1 Assembly
10
[H] Camera Assembly (1)
11
Jbottom Case Section
13
Shoulder Pad
13
[K] Shoulder Pad Assembly
14
[L] Top Case Section (1)
14
[L] Top Case Section (2)
15
Mhandle Section
15
Nhandle Cover Section
16
Ptop Operation Section
16
Qreceiver Cover Assembly
16
Rback Case Section
17
[S] Jack Panel Section
18
Tbottom Cover Assembly
18
Uside Jack Assembly
18
Mechanical Chassis Assembly (1)
19
Mechanical Chassis Assembly (2)
21
Mechanical Chassis Assembly (3)
23
Packing Parts Assembly
26
Advertisement
Related Products
Panasonic AJ-HDX900 - Camcorder - 1080i
Panasonic AJ-HDX900MC
Panasonic AJ-HDX400P
Panasonic AJ-HDX400E
Panasonic AJ-HDX900E
Panasonic AJ-HDX400
Panasonic AJHDC27H - DVCPRO HD CAMERA
Panasonic DVCPRO HD AJ-HD1800E
Panasonic DVCPRO HD AJ-HD1800P
Panasonic AJ-HD1400MC
Panasonic Categories
Camcorder
Air Conditioner
TV
Digital Camera
Cordless Telephone
More Panasonic Manuals
Login
Sign In
OR
Sign in with Facebook
Sign in with Google
Upload manual
Upload from disk
Upload from URL